If you’ve ever picked up a camera and wondered what half of its buttons, dials, and hidden components actually do, you’re not alone. Most photographers — even ones who shoot every week — can name a lens and a shutter button but draw a blank on everything else happening inside that little box.
This guide breaks down every major camera part in plain English, explains what each one does, and shows you how they all work together to capture a single photo. Whether you shoot with a DSLR, a mirrorless camera, or even a movie camera, you’ll walk away knowing exactly what’s inside your gear — and why it matters.
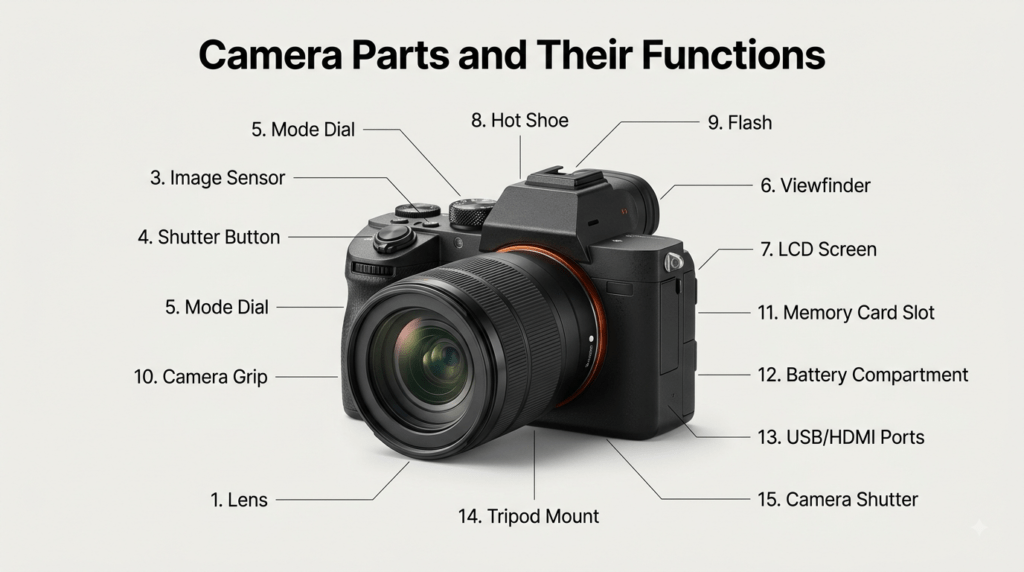
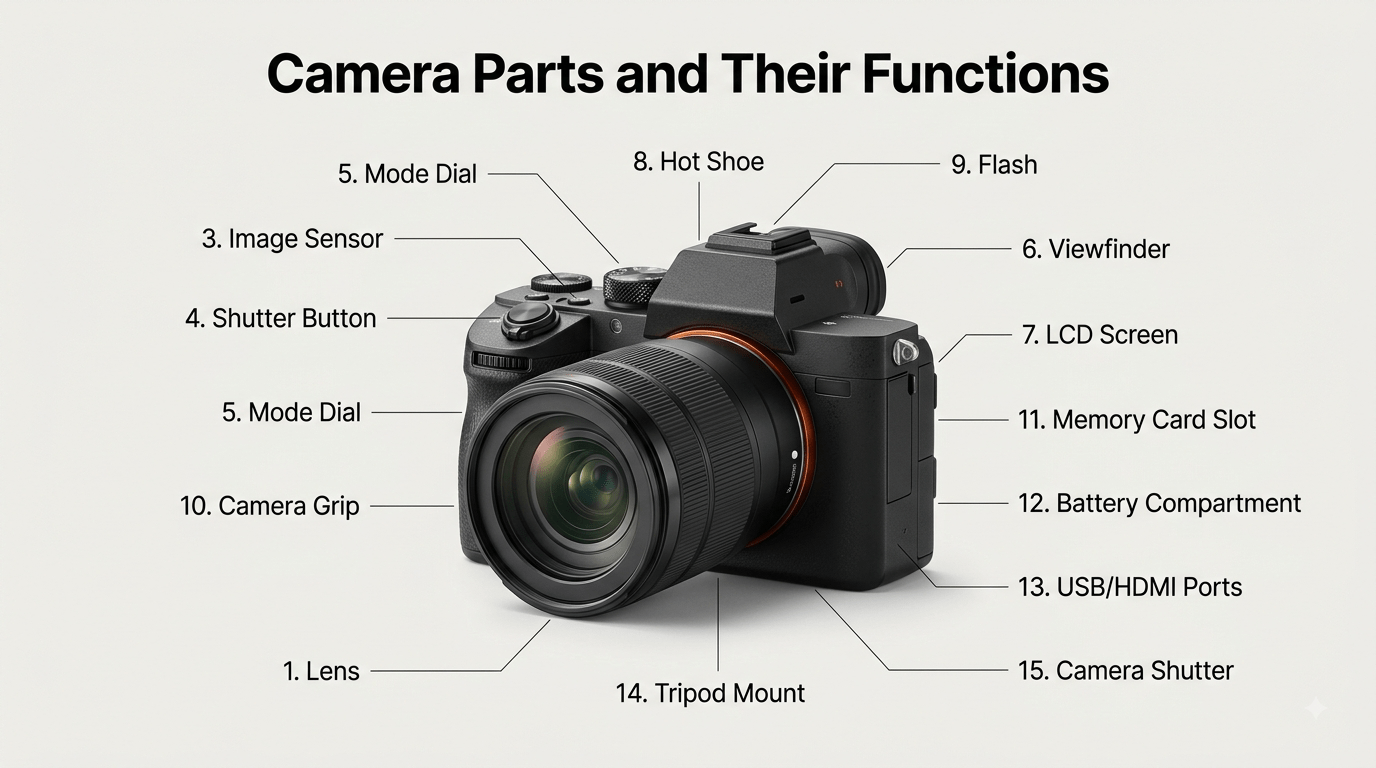
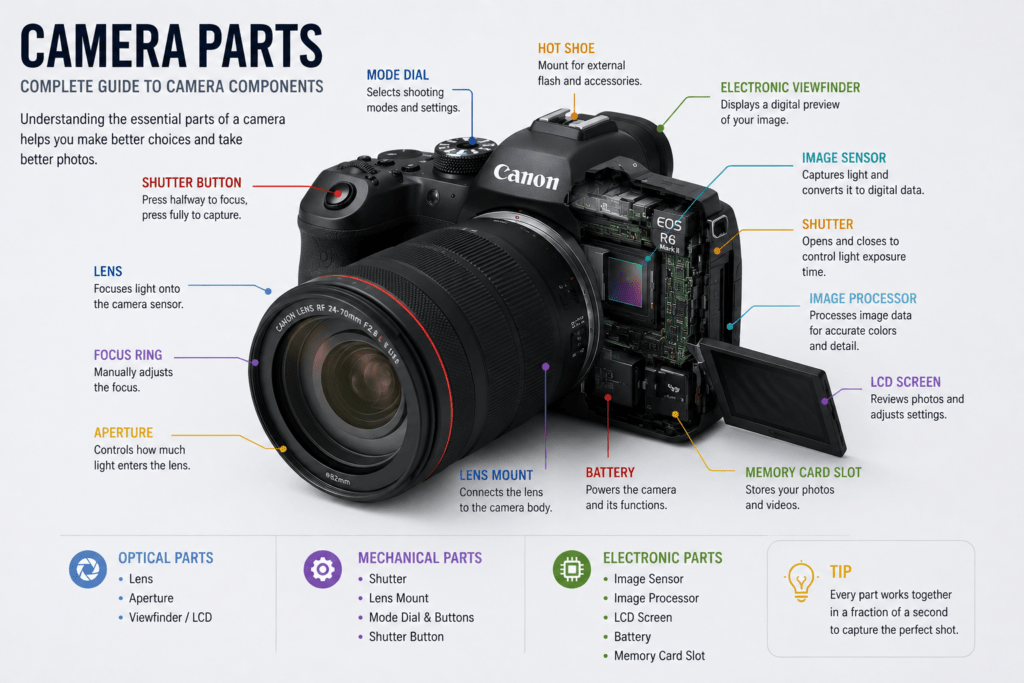
Camera parts are the individual mechanical, optical, and electronic components that work together to capture, process, and store an image. This includes external parts you touch every day, like the shutter button and mode dial, as well as internal parts you never see, like the image sensor and processing engine.
Broadly, camera parts fall into three categories:
Optical parts — the lens, aperture blades, and viewfinder, which control how light enters and is framed.
Mechanical parts — the shutter, mode dial, grip, and buttons, which control timing and physical operation.
Electronic parts — the image sensor, processor, and memory card slot, which convert light into a digital image and store it.
Understanding these categories makes it much easier to diagnose a problem, choose the right camera accessories, or simply get more intentional results from your photography gear.
Why Understanding Camera Parts Matters
Knowing your camera’s parts and functions isn’t just trivia — it directly affects the quality of your photos and how confidently you use your gear.
Here’s why it’s worth the ten minutes it takes to learn:
Better troubleshooting. If you know what the aperture does, you can immediately tell whether a blurry photo is a focus issue or a depth-of-field issue.
Smarter buying decisions. Understanding lens parts and sensor types helps you avoid overpaying for features you don’t need.
Longer equipment life. Knowing how to clean a sensor or protect a lens mount prevents expensive repairs.
Faster manual shooting. Once you understand how the shutter, aperture, and ISO controls interact, manual mode stops feeling intimidating.
In short, camera parts and functions are the foundation of photography literacy. Everything else — composition, lighting, editing — builds on top of this base.
Let’s go through every essential camera part, one at a time.
Camera Lens
The lens is the piece of camera equipment that gathers and focuses light onto the image sensor. It’s arguably the single most important part of any camera system, because no amount of sensor resolution can fix an image formed by a poor-quality lens.
Lenses come in two broad types: prime lenses (fixed focal length, like 50mm) and zoom lenses (variable focal length, like 24-70mm). Interchangeable-lens cameras — DSLRs, mirrorless cameras, and most movie cameras — let you swap lenses to change focal length, aperture range, or shooting style.
Practical example: A portrait photographer often reaches for an 85mm prime lens because its narrower field of view and wide maximum aperture create flattering compression and background blur, while a landscape photographer prefers a wide 16-35mm zoom to fit more of the scene into the frame.
The lens mount is the mechanical and electronic interface where the lens attaches to the camera body. It aligns the lens correctly, locks it in place, and transmits electronic signals for autofocus, aperture control, and image stabilization.
Every camera brand uses its own proprietary mount, which is why lenses aren’t universally interchangeable across brands. For example, Canon’s RF mount — introduced in September 2018 alongside the original EOS R — has a 54mm internal diameter and a short 20mm flange distance, which is the gap between the mount and the sensor.
Nikon’s Z mount, also launched in 2018, uses a 55mm inner diameter and an even shorter 16mm flange distance, making it the widest full-frame mirrorless mount currently on the market. A shorter flange distance and wider mount generally allow lens designers to build faster, optically sharper lenses, which is one of the core engineering advantages of mirrorless systems over older DSLR mounts.
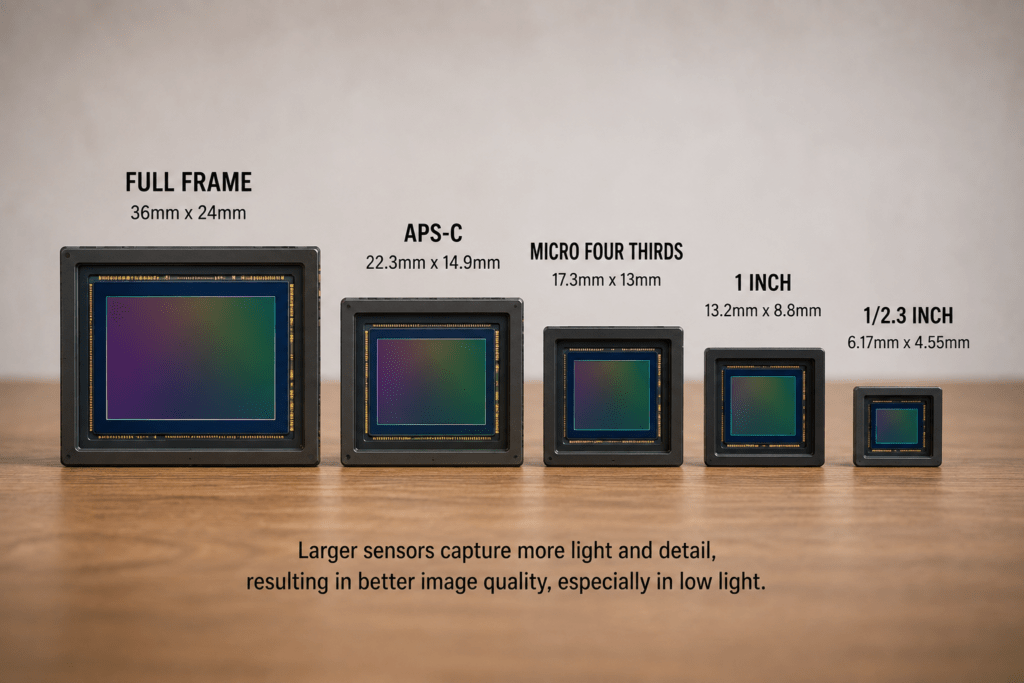
The image sensor is the digital “film” of a camera — a chip covered in millions of light-sensitive photosites that convert incoming light into an electrical signal, which is then processed into a digital image. Sensor size has a huge impact on image quality, especially in low light.
Common sensor sizes include:
Full-frame — roughly the size of a 35mm film frame, offering the best low-light performance and shallowest depth of field.
APS-C — smaller than full-frame, common in entry-level and mid-range DSLR and mirrorless cameras.
Micro Four Thirds — even smaller, used in compact mirrorless systems for a lighter, more portable setup.
Practical example: Two cameras with the same megapixel count but different sensor sizes will not produce identical results — the full-frame sensor typically gathers more light per pixel, giving cleaner images at high ISO settings.
For more details on sensor dimensions and performance, read our Camera Sensor Guide.
Shutter
The shutter is a mechanical or electronic curtain that controls how long light is allowed to hit the sensor. This duration is called shutter speed, and it’s measured in fractions of a second (like 1/1000s) or full seconds for long exposures.
Shutter speed controls two things simultaneously: exposure (how bright or dark the image is) and motion (whether movement appears frozen or blurred).
Practical example: A sports photographer might use 1/2000s to freeze a runner mid-stride, while a landscape photographer might use 2 seconds to turn a waterfall into silky, flowing water.
Aperture
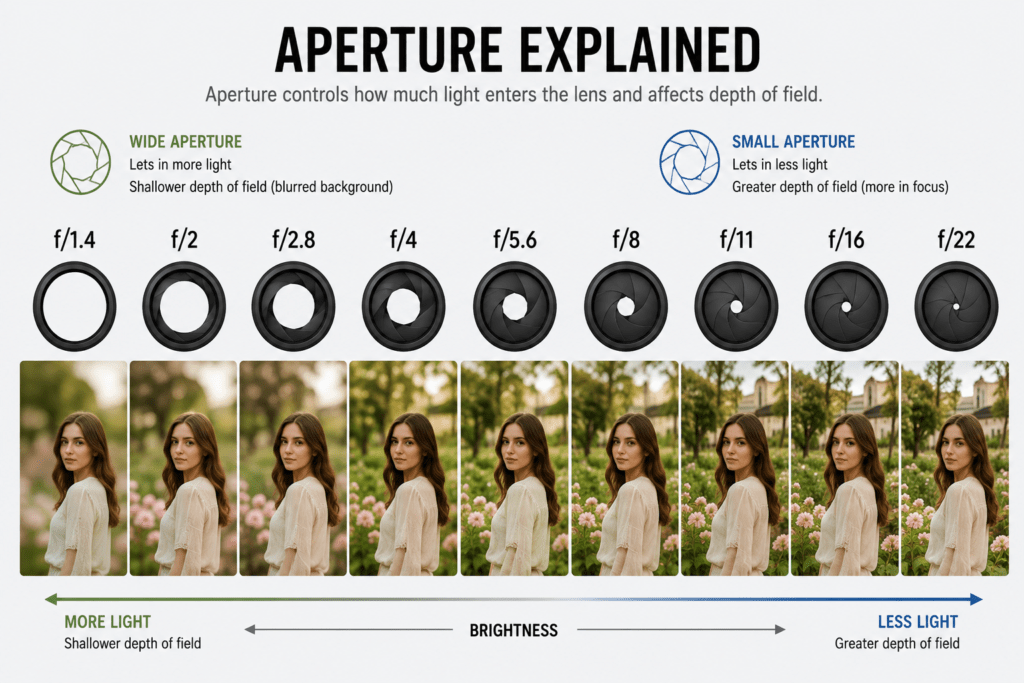
The aperture is an adjustable opening inside the lens, formed by a ring of overlapping blades, that controls how much light passes through to the sensor. It’s measured in f-stops (f/1.4, f/2.8, f/8, and so on) — the lower the number, the wider the opening and the more light it lets in.
Aperture also controls depth of field, which is how much of the image appears in sharp focus from front to back.
Practical example: A wide aperture like f/1.8 blurs the background beautifully for portraits, while a narrow aperture like f/11 keeps an entire landscape sharp from foreground to horizon.
Viewfinder
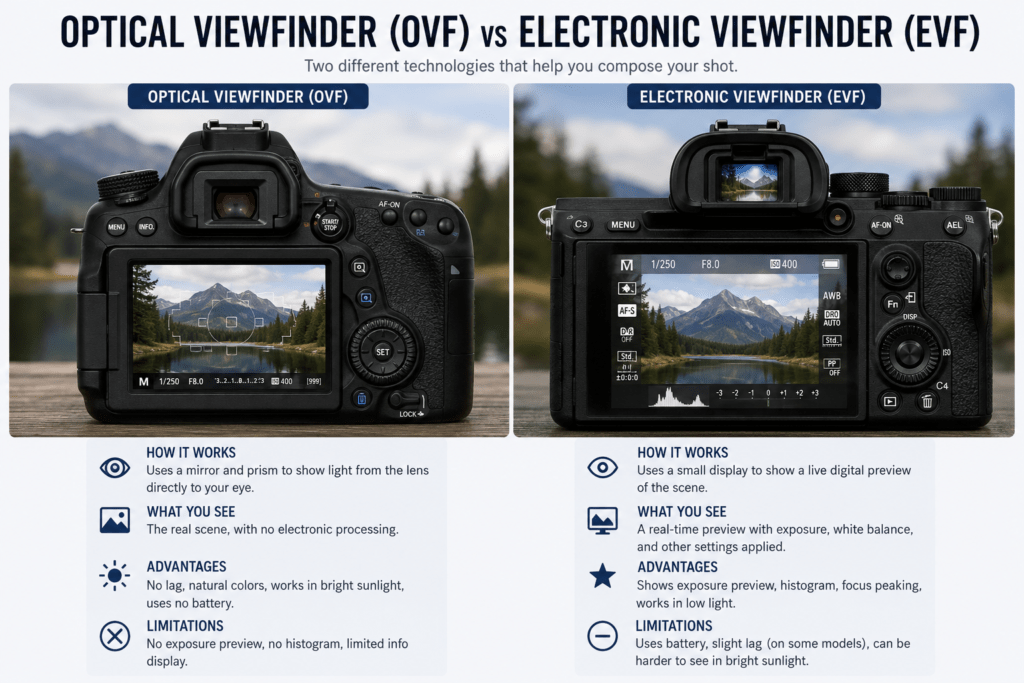
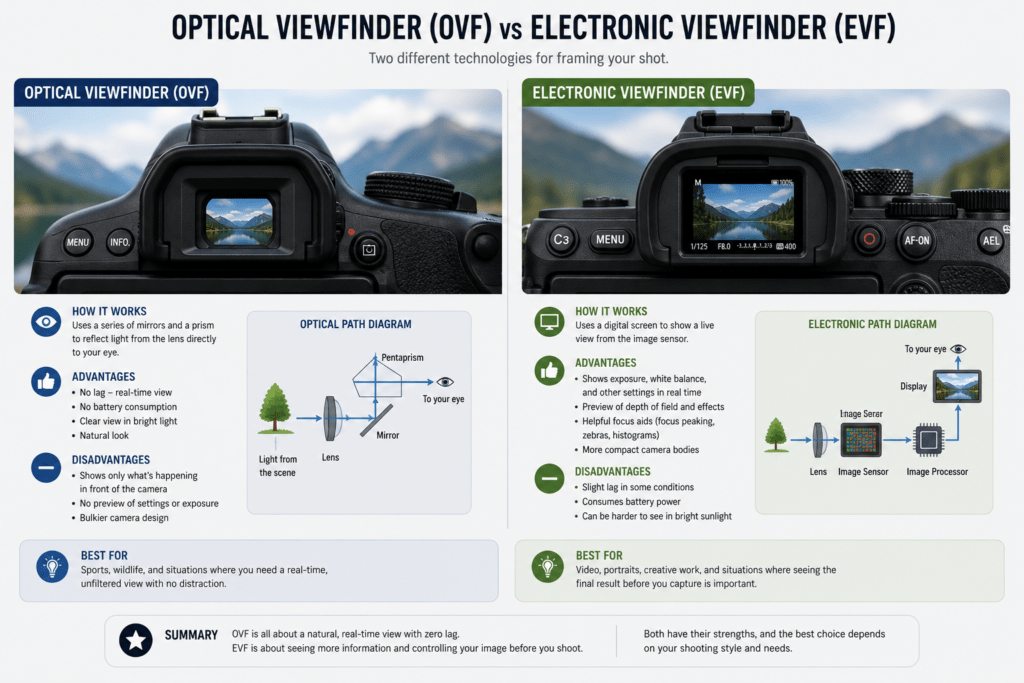
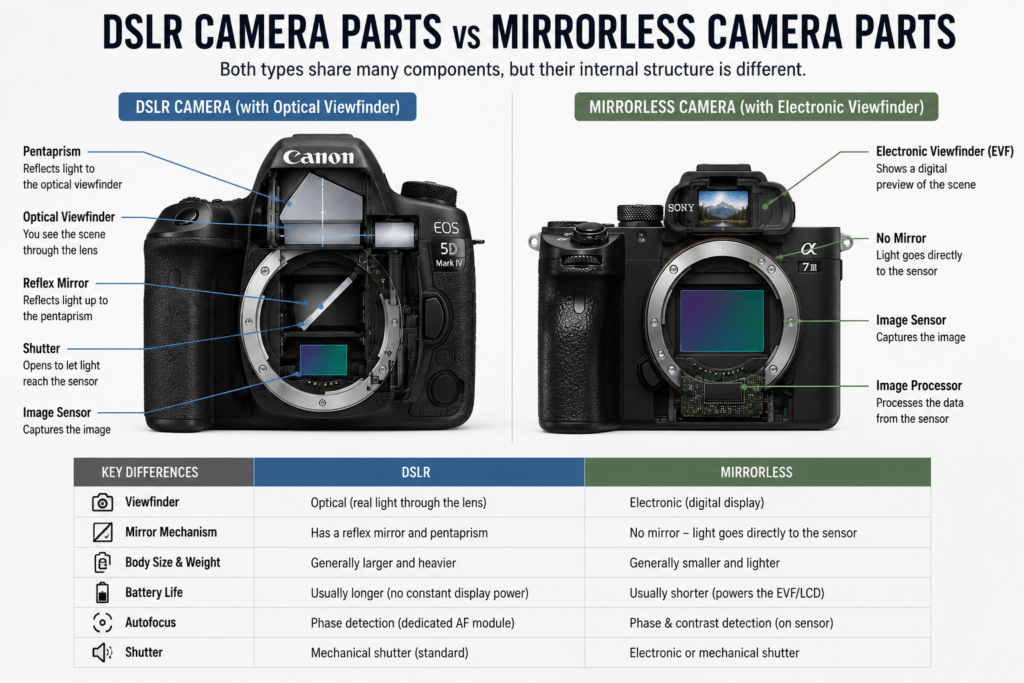
The viewfinder is the eyepiece you look through to compose a shot. DSLRs use an optical viewfinder (OVF), which shows the scene through a mirror and prism system in real time using actual light. Mirrorless cameras use an electronic viewfinder (EVF), a tiny digital screen that displays a live preview of exactly how the photo will look, including exposure and white balance.
EVFs have become the dominant standard in modern mirrorless cameras because they let you preview the final exposure before you even press the shutter button — something an optical viewfinder can’t do.
LCD Display
The LCD display is the larger screen on the back of the camera used for reviewing images, navigating menus, and — on most modern cameras — composing shots in Live View mode. Many current mirrorless and DSLR cameras use articulating or tilting LCD screens, which make shooting from high or low angles far more comfortable.
Touchscreen LCDs also allow you to tap to focus, swipe through images, and adjust settings without digging through physical menus.
Autofocus System
The autofocus (AF) system automatically adjusts the lens elements to bring your subject into sharp focus. It relies on sensors that detect contrast or phase differences in the scene and drive a motor inside the lens to correct focus almost instantly.
Modern cameras use sophisticated AF technology such as eye-detection and subject-tracking autofocus, which can lock onto a person’s eye or an animal’s face and keep it in focus even as they move.
Practical example: When photographing a running dog, eye-tracking autofocus keeps the animal’s eyes sharp throughout the sequence, even as it changes direction — something manual focus simply can’t keep up with.
Mode Dial
The mode dial is the rotating control, usually on top of the camera, that switches between shooting modes: Auto, Program (P), Aperture Priority (A/Av), Shutter Priority (S/Tv), Manual (M), and often several custom or scene modes.
Aperture Priority lets you set the aperture while the camera picks the shutter speed.
Shutter Priority does the reverse.
Manual mode gives you full control over both, plus ISO.
The shutter button is the trigger you press to take a photo, but it actually has two functions built into one control. A half-press activates autofocus and exposure metering, while a full press fires the shutter and captures the image.
Learning to use the half-press technique is one of the fastest ways to improve focus accuracy, since it lets you lock focus and recompose before finishing the shot.
Built-in Flash
The built-in flash is a small pop-up light source found on many entry-level and mid-range cameras, used to add supplemental light in dim conditions. While convenient, it produces a harsh, flat light and is generally considered a backup option rather than a primary lighting tool.
Most professional photographers instead invest in an external flash or speedlight, mounted via the hot shoe, for softer and more controllable lighting.
Hot Shoe
The hot shoe is the mounting bracket on top of the camera used to attach external accessories like flashes, microphones, or wireless triggers. It also transmits electronic signals, allowing accessories to sync with the camera’s shutter timing automatically.
Memory Card Slot
The memory card slot houses the removable storage card — typically SD, microSD, or CFexpress — where your photos and videos are saved. Some higher-end cameras include dual card slots, which allow simultaneous backup recording or separating photo and video files onto different cards.
Faster card types, like CFexpress, are especially important for movie camera parts and high-speed burst photography, since they can keep up with large, rapid data transfers without the camera’s buffer filling up.
Battery
The battery powers every electronic function in the camera, from the sensor and processor to the LCD display and autofocus motors. Mirrorless cameras generally consume more battery than DSLRs because they constantly power an electronic viewfinder or LCD screen, even when just composing a shot.
Carrying at least one spare battery is one of the simplest and most important pieces of camera accessories advice for any shoot longer than an hour.
Grip
The grip is the contoured, often rubberized section of the camera body designed to be held comfortably in your right hand. A well-designed grip reduces hand fatigue during long shoots and improves stability, which directly affects sharpness in handheld shots.
Some photographers add a battery grip accessory, which extends the camera body, adds a second battery, and often duplicates key controls for comfortable vertical shooting.
Tripod Mount
The tripod mount is a threaded socket on the bottom of the camera body used to attach a tripod plate or monopod. It follows a standardized 1/4-inch-20 thread size across nearly all cameras, which is why tripod compatibility is rarely an issue regardless of brand.
Microphone
The built-in microphone captures audio during video recording. While convenient, built-in mics tend to pick up handling noise, wind, and ambient sound indiscriminately, which is why serious videographers usually attach an external microphone through the camera’s mic port or hot shoe.
Speaker
The speaker allows you to play back recorded audio and video directly from the camera, and it’s also used for basic operational sounds like the autofocus confirmation beep or self-timer countdown.
Ports (USB, HDMI, Microphone)
Most cameras include a small set of ports along one side of the body:
USB port — used for charging, tethered shooting, and transferring files to a computer.
HDMI port — outputs a live video feed to an external monitor or recorder, essential for professional video work.
Microphone port — a 3.5mm jack for connecting external microphones.
Headphone port (on higher-end models) — lets you monitor audio levels in real time while recording.
Processing Engine
The processing engine, often called an image processor, is the chip responsible for converting raw sensor data into a finished photo or video file. It handles noise reduction, color processing, autofocus calculations, and continuous shooting speed.
A faster processing engine generally means quicker startup times, better high-ISO noise handling, and higher frames-per-second in burst mode.
Buffer Memory
Buffer memory is temporary onboard storage that holds images immediately after they’re captured, before they’re written to the memory card. A larger buffer allows you to shoot longer continuous bursts without the camera slowing down or locking up.
Practical example: During a wildlife burst sequence, a camera with a shallow buffer might slow to a crawl after 15–20 frames, while one with a deep buffer can keep firing for 100+ frames before it needs to catch up.
ISO Controls
ISO controls adjust the sensor’s sensitivity to light. Lower ISO values (like 100) produce cleaner images with less digital noise, while higher ISO values (like 6400 or above) brighten the image in dark conditions at the cost of visible grain.
ISO works alongside shutter speed and aperture to form the three pillars of exposure, often called the exposure triangle.
Function Buttons
Function buttons (often labeled Fn) are customizable controls that let you assign frequently used settings — like ISO, white balance, or autofocus mode — to a single button press instead of digging through menus. Most modern DSLR and mirrorless cameras include two to four programmable function buttons for exactly this reason.
DSLR Camera Parts vs Mirrorless Camera Parts
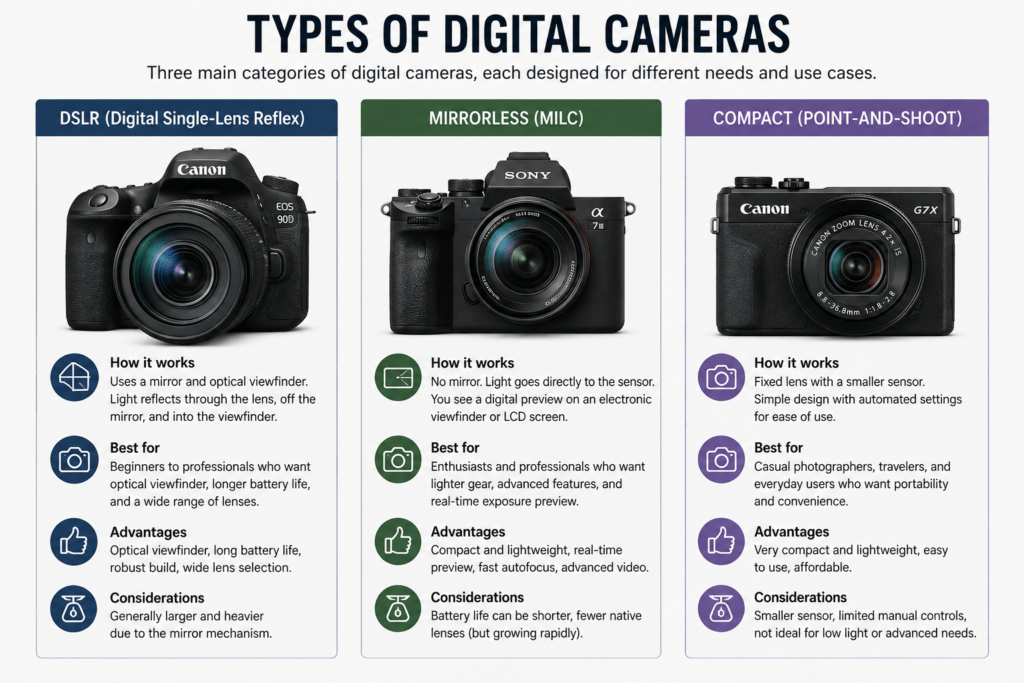
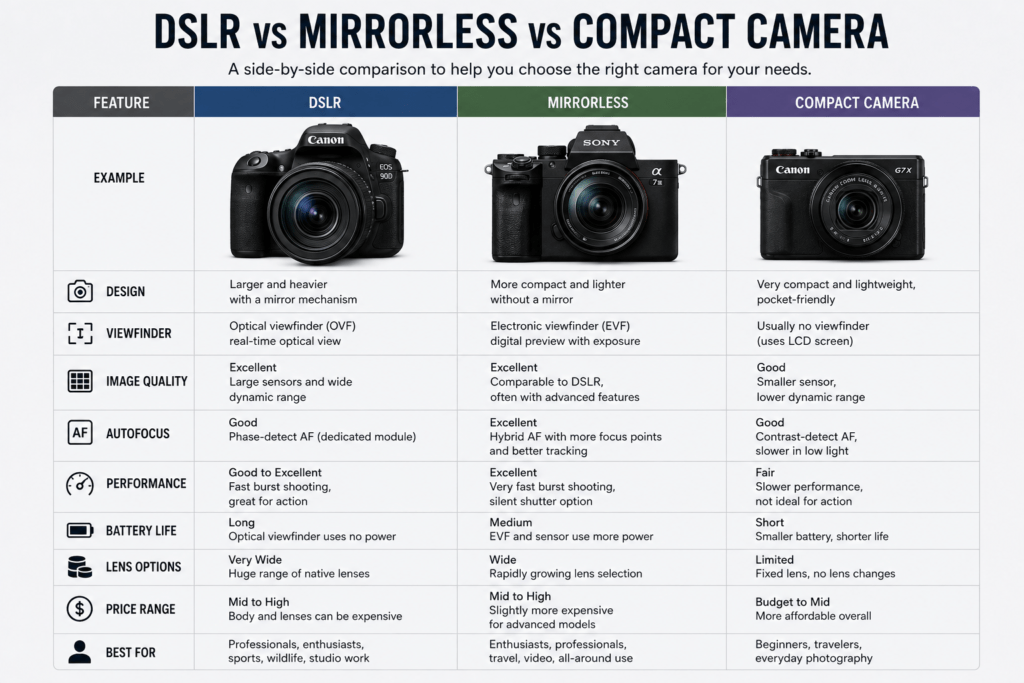
While DSLR and mirrorless cameras share many of the same core components, a few key differences define how each system works.
For a detailed breakdown of which system suits your photography style best, see our head-to-head comparison: DSLR vs Mirrorless.
Camera Part
DSLR
Mirrorless
Viewfinder
Optical viewfinder (OVF) using a mirror and prism
Electronic viewfinder (EVF) using a digital display
Internal Mirror
Present — reflects light to the viewfinder
Absent — light goes directly to the sensor
Autofocus
Dedicated phase-detection AF module (through the mirror)
On-sensor phase/contrast detection AF
Body Size
Generally larger and heavier due to mirror box
Typically smaller and lighter
Lens Mount Flange Distance
Longer (e.g., Nikon F mount: 46.5mm)
Shorter (e.g., Nikon Z mount: 16mm; Canon RF mount: 20mm)
Battery Life
Generally longer, since the OVF uses no power
Generally shorter, since the EVF/LCD is always active
Shutter Sound/Feel
Mechanical mirror slap plus shutter
Quieter, can offer fully electronic silent shutter
Live View Performance
Slower, since it wasn’t the primary design focus
Fast and seamless, since it’s the native shooting mode
Both systems remain capable, professional-grade tools — the right choice depends on your priorities around size, battery life, and lens ecosystem.
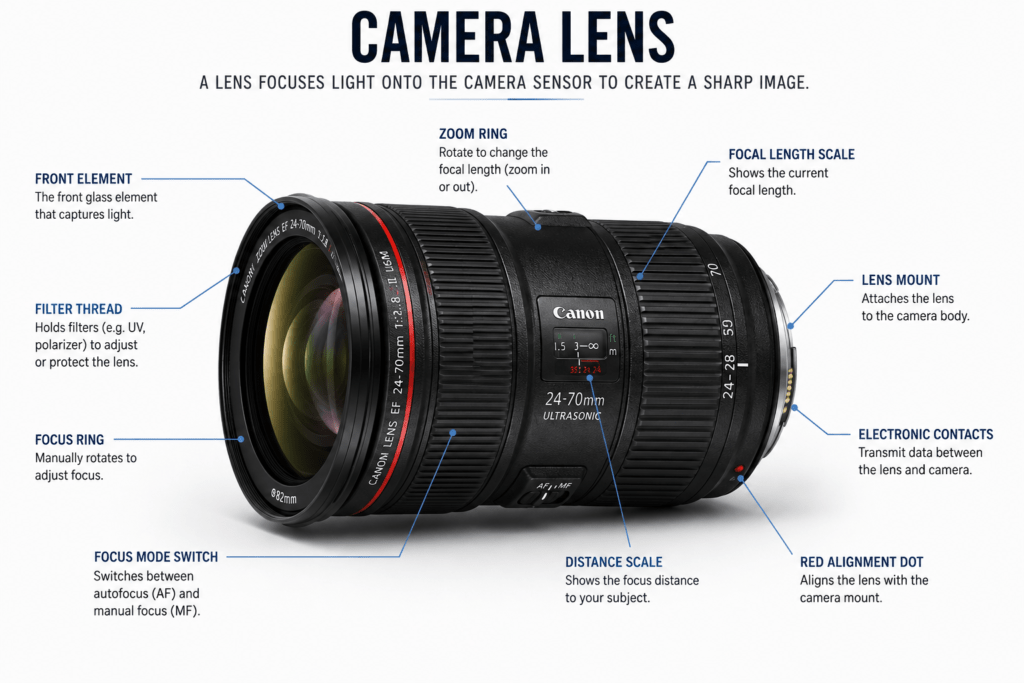
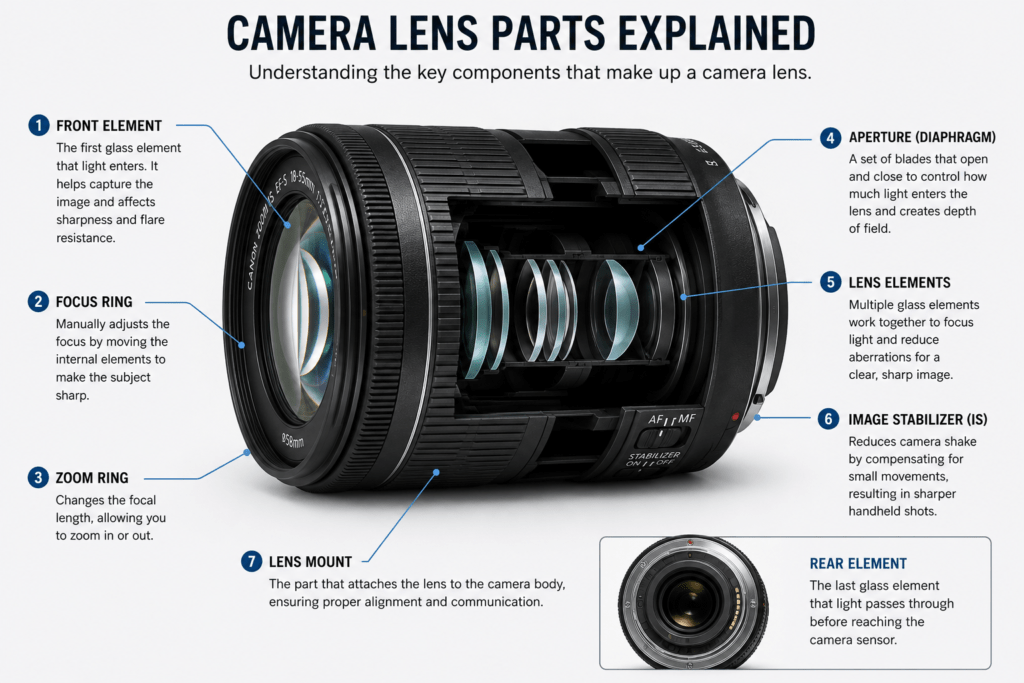
Understanding lens parts and camera lens parts helps you get more out of your glass and troubleshoot issues faster. Here are the core lens parts camera systems rely on:
Front element — the outermost glass element; the most exposed and most vulnerable to scratches, which is why many photographers use a protective filter here.
Lens barrel — the outer housing that holds all internal elements in place.
Focus ring — a manually rotating ring used to adjust focus by hand.
Zoom ring — found on zoom lenses, used to change focal length.
Aperture ring — present on some lenses (especially manual and cinema lenses) to physically control the aperture without using camera menus.
Lens elements and groups — internal pieces of curved glass arranged in groups to correct distortion, chromatic aberration, and other optical flaws.
Diaphragm blades — the overlapping blades that form the aperture opening.
Rear element — the innermost glass element, closest to the sensor.
Lens mount contacts — electronic pins that communicate autofocus, aperture, and stabilization data to the camera body.
Image stabilization unit — found in stabilized lenses, this compensates for hand shake by shifting internal elements.
Focus motor — the internal mechanism (such as USM, STM, or a linear motor) that physically drives autofocus.
Essential Camera Accessories
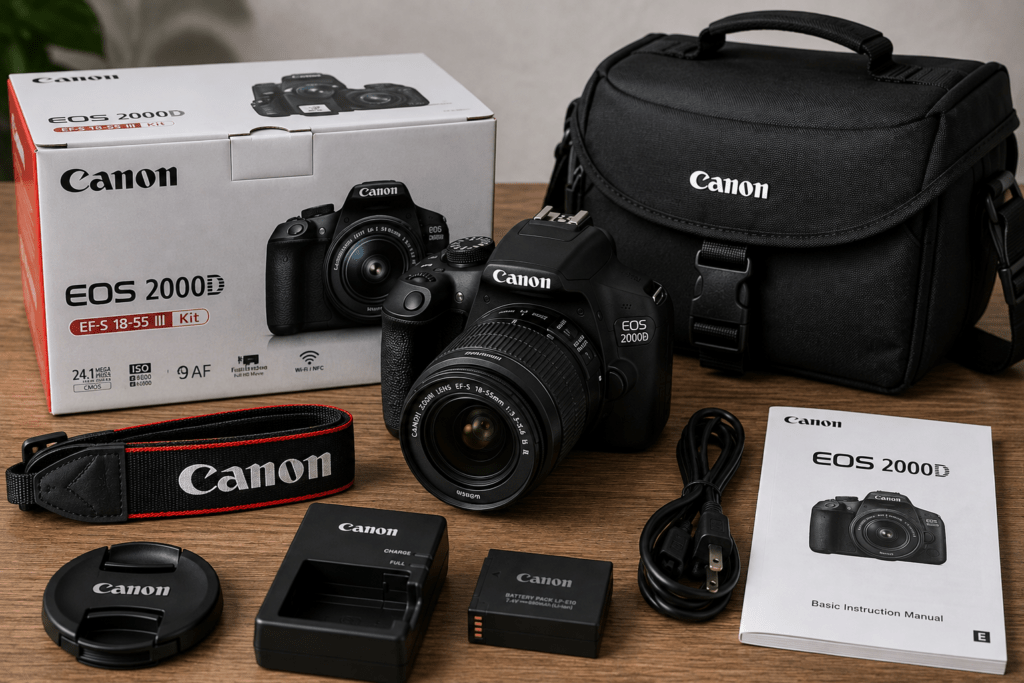
Beyond the camera body itself, a solid set of camera accessories rounds out any working photography gear kit:
Tripod — for stability in long exposures, video, and low light.
Extra batteries — because running out of power mid-shoot is avoidable.
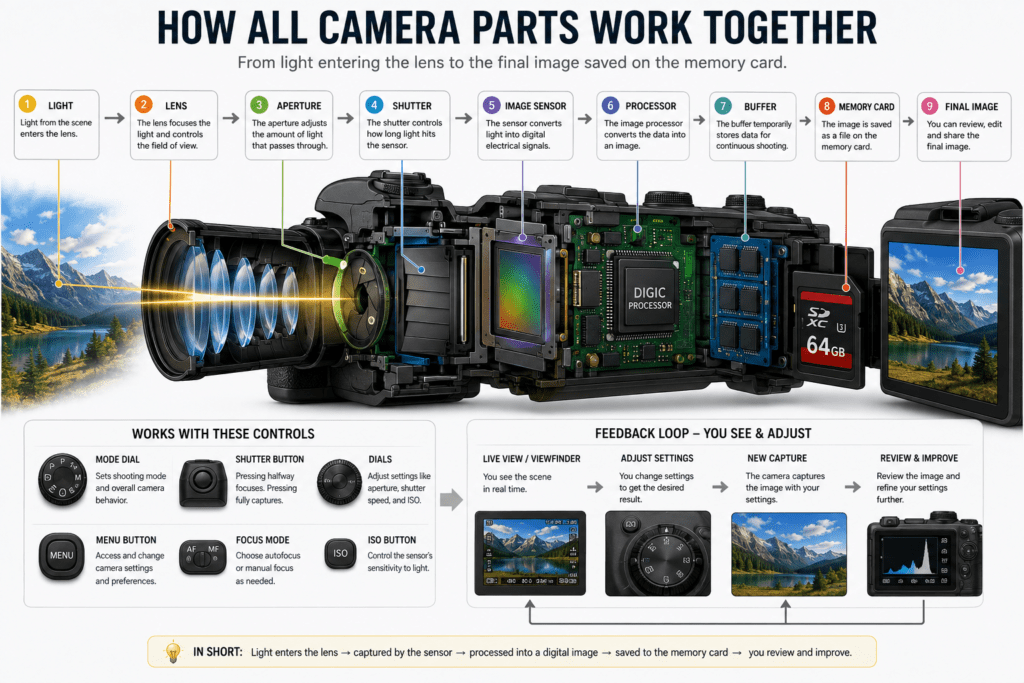
Here’s a simple, step-by-step breakdown of what happens the moment you press the shutter button — and how every camera part plays a role.
file faeffbccdfeb
You compose the shot using the viewfinder or LCD display, framing your subject.
A half-press of the shutter button triggers the autofocus system, which adjusts the lens elements until the subject is sharp.
The aperture narrows or widens to the f-stop you’ve selected, controlling how much light will enter.
You fully press the shutter button, which tells the shutter to open for the exact duration set by your shutter speed.
Light passes through the lens, through the open aperture, and lands on the image sensor.
The image sensor converts that light into an electrical signal based on your ISO setting.
The processing engine instantly converts that raw signal into a finished image file, applying noise reduction and color processing.
The image briefly sits in buffer memory before being written to the memory card.
The LCD display shows you a preview so you can check exposure and focus immediately.
Every part depends on the one before it — a slow autofocus system, a full buffer, or a scratched lens element can each break this chain at a different point.
Common Camera Problems Related to Different Parts
Even reliable photography gear runs into issues. Here are the most common ones and which part is usually responsible:
Blurry images — often caused by a wide aperture combined with poor focus accuracy, or by slow shutter speed during handheld shots.
Dust spots in every photo — almost always a dirty image sensor, especially common on DSLRs after frequent lens changes.
Camera won’t power on — check the battery first, followed by the battery contacts and charging port.
Slow continuous shooting — usually a full buffer memory or a slow memory card that can’t keep up with the processing engine.
Autofocus hunting or failing — can point to dirty lens contacts, a lens mount misalignment, or low-contrast lighting conditions.
Flash not firing — check the hot shoe connection or whether the built-in flash is set to manual pop-up.
Viewfinder appears dark or glitchy — on mirrorless cameras, this often means an EVF refresh or brightness setting issue; on DSLRs, it can mean mirror misalignment.
Files not saving — usually a memory card error, a locked SD card switch, or a full card.
Camera Maintenance Tips
Good maintenance habits protect your investment and keep every camera part functioning as designed.
Clean the sensor regularly using a proper blower or sensor-cleaning swab — never canned air directly inside the mount.
Store lenses with caps on to protect both the front and rear elements from dust and scratches.
Keep silica gel packets in your camera bag to control humidity and prevent fungus growth inside lens elements.
Update firmware periodically through the manufacturer’s official software, since updates often improve autofocus and stability.
Avoid changing lenses in dusty or windy environments whenever possible.
Remove batteries during long storage periods to prevent corrosion from leaks.
Use a camera strap or wrist strap at all times to prevent accidental drops.
Have your camera professionally serviced every couple of years if you shoot frequently, especially for shutter mechanism wear.
Ignoring the exposure triangle. Many beginners adjust ISO, aperture, or shutter speed in isolation without understanding how the three interact.
Buying accessories before understanding core parts. It’s tempting to buy filters and gadgets before learning what the aperture or shutter actually does.
Never cleaning the sensor. Dust spots get blamed on “camera problems” when a simple cleaning would fix it.
Leaving the camera in Auto mode indefinitely. This prevents you from ever learning how aperture, shutter speed, and ISO actually affect your images.
Using the built-in flash as a primary light source. It’s usually the least flattering lighting option available.
Not backing up memory cards. A single card failure can wipe out an entire shoot.
Overlooking lens mount compatibility. Buying a lens that doesn’t match your camera mount is one of the most common (and costly) beginner mistakes.
The main parts of a camera include the lens, lens mount, image sensor, shutter, aperture, viewfinder, LCD display, autofocus system, mode dial, shutter button, and memory card slot, along with supporting parts like the battery, grip, and processing engine.
2. What is the most important part of a camera?
The image sensor and the lens are generally considered the two most important parts, since together they determine the maximum possible image quality — no other component can fix a poor sensor or a poor lens.
3. What is the difference between DSLR parts and mirrorless camera parts?
The biggest difference is the viewfinder and internal mirror: DSLRs use an optical viewfinder with a mirror and prism system, while mirrorless cameras use an electronic viewfinder and have no internal mirror at all.
4. What does the aperture do in a camera?
The aperture controls how much light enters through the lens and also determines depth of field, meaning how much of the image appears in sharp focus.
5. What is the function of the camera’s image sensor?
The image sensor converts light into an electrical signal, which the camera’s processor then turns into a digital photo or video file.
6. What lens parts affect image quality the most?
The front and rear elements, the overall lens element/group design, and the diaphragm blades that form the aperture all have a major effect on sharpness, distortion, and background blur quality.
7. Why is my camera sensor showing dust spots in photos?
Dust settles on the sensor over time, especially when lenses are changed frequently in dusty environments, and requires a proper sensor-cleaning tool to remove.
8. What camera accessories should every beginner own?
A tripod, spare batteries, extra memory cards, a lens cleaning kit, and a protective camera bag are considered essential camera accessories for beginners.
9. What is the buffer memory in a camera used for?
Buffer memory temporarily stores images right after capture, before they’re written to the memory card, which allows for faster continuous burst shooting.
10. Can I use any lens on any camera body?
No — lenses are designed for specific lens mounts, so a lens must match your camera’s mount system (or be used with a compatible mount adapter) to physically attach and communicate properly.
Final Thoughts
Camera parts might seem overwhelming at first, but once you understand what each one does — and how they work together in that split second between pressing the shutter and seeing your image appear — everything about photography starts to make more sense. You’ll troubleshoot faster, buy smarter camera accessories, and shoot with far more confidence in manual mode.
Whether you’re working with DSLR parts, mirrorless camera parts, or even movie camera parts, the underlying principles stay remarkably consistent: light travels through the lens, passes through the aperture, hits the sensor, and gets processed into the image you finally see. Master that chain, and you’ve mastered the foundation of photography itself.